Tuesday, October 27, 2015

Masala Kaju

Masala Kaju/Spicy Cashews


Masala Kaju as the name suggests is a preparation of cashews in which cashews are roasted and infused with various spices and flavors. Masala Kaju makes a super snack both to prepare and please the guest. Whether it’s a cocktail party or winter evening with friends, An outing with friends or long distance travel, these Spicy Cashews are very handy to carry and is loved by all.

Masala Cashews are available in various different Flavors; I tried my version of Spicy Cashews with a dominating flavor of Cumin and Asafetida.

Few days back we got a pack of Masala Peanuts from a store, and I was instantly in love with the flavors used to prepare those Peanuts. Though the peanuts were fried , thus load of calories but I was so loving it.. :D :p

I immediately thought of giving that flavor a try with Cashews with much less oil and healthier version. So this Cashew preparation includes only 1 Tbsp of oil/Butter so you can munch them guilt free…J

Sharing the ingredients required followed by the recipe/Process:

Ingredients required
·         250 grams of good quality whole Kaju/Cashews
·         1 tsp of Clarified butter/Ghee
·         Salt as per taste
·         ½ TBSP Chat Msala
·         ½  tbsp roasted Cumin Powder
·         ¼ tsp of hing/ Asafetida
·         1 tsp of Garam Masala
·         ½ tsp of Black Salt
·         ½ tsp of Dry Mango Powder
·         1 tsp whole Cumin Seed

Process
1.)    On a microwave safe plate spread cashew and dry roast on full power for 2.5 minutes, ensure to check every 30 minutes ( please ensure to check the cashews every 30 seconds as every Microwave is different in terms of power and temperatures accordingly).
2.)    You will know that the cashews are done when you will see a light golden brown color on them.
3.)    Now, take them out on a plate or in a bowl and lets them rest for a minute or so.
4.)    In the meanwhile mix all the spices together in a small bowl, except cumin Seeds, Clarified butter and Asafetida.
5.)    In a small pan heat clarified butter till its Smokey and then turn off the flame.
6.)    Add cumin seeds and let it splutter a little.
7.)    Add Asafetida and mix well.
8.)    Pour this cumin and Asafetida infused clarified butter on cashews and mix well. This is not only help to enhance the taste but with the help of butter, rest of the spices will also stick well to cashews.
9.)    Sprinkle the spice mix on to the cashews and mix well till each cashew is coated with the spice.
10.) Your Masala Kaju/Spicy Cashews are ready. You can store them for atleast 5-6 and maximum to 15-20 days in an ai tight container.

For more interesting, vegetarian recipes and eggless baking recipes, please follow us on - https://www.facebook.com/Chapanbhog


So, what are you waiting for, go try them and share your experiences with me… I would love to hear feedback from my lovely readers.

Happy Cooking
Shikha


Kesari Badam Katli/Saffron Infused Almond Fudge

Kesari Badam Katli/ Saffron infused Almond fudge


Indian Festive season is just around the corner, and any Indian festival without some awesome and royal preparation of sweets is absolutely incomplete. Everyone has their own way and traditions of celebration, with my family; festival basically means taking blessing from almighty and parents and enjoys festival with good food and lots of sweets..:)

This season there are few things, Many rather :P on my to do list for Diwali. Badam Barfi/Katli was one of them. I tried tried tried but failed. Was able to get the correct texture but wasn’t able to bring the mixture to a consistency where the Fudge/Barfi mixture would Set. Then my adorable friend Farruk’s post of Kaju (Cashew) katli/Barfi came to rescue ( here Recipe link for Kaju Katli -  Click Here). I understood where I was wrong and then One fine day gathered the courage of trying the experiment again, and yes this time it came absolutely perfect Happy Happy me.. :)

Wholesome goodness of Almonds, No adulteration of Milk powder, Mawa, or any other binder and filler. Added advantage of this recipe is use of very less fat (Ghee/Unsalted Butter).
Without any further discussion let’s get started on how to make these easy Badam Katli.

Ingredients
·         250 Grams Almonds
·         125 grams Sugar (approx.  ( approx. ¾ cup, you can increase or reduce the sugar quantity as per your sweet preferences)
·         1 cup water for sugar Syrup
·         3-4 cups of boiling hot water to soak almonds
·         1 tbsp Ghee/ Unsalted butter to spread
·         ¼ tsp of good quality Saffron
·         2 tbsp warm milk
·         Butter paper or thick plastic sheet to spread and cut


Process
1.)    In a small bowl take Warm milk and add Saffron to it. Leave this for minimum 1 hour. This will help infuse the saffron’s flavor and color to milk.
2.)    In a big bowl take the boiling hot water and drop almonds in the bowl.
3.)    Cover this bowl and leave for at least 30-40 minutes.
4.)    Once done, the almond peel will be puffed from the almond and now you can easily take them off.
5.)    It will take little time, but the end product is worth all the efforts.. J
6.)    Once all the almonds are peeled, put them in a blender/mixer jar and make fine powder. ( make sure the powder is made
a.       Without using any water/Milk
b.      Is made as fine as possible so that while setting there is no coarse almond pieces which will create problem.
7.)    In a thick and a heavy bottom pan (preferably Non stick pan) add sugar and water. On high flame let the sugar dissolve and then let the mixture cook on medium flame for 2-3 minutes.
8.)    Once done, add the Saffron milk to sugar Syrup and mix well.
9.)    Now, add the Almond powder to the pan and be ready to show some muscle power, as now you need to continuously stir the mixture.
10.) As the mixture cooks it will becomes difficult to stir since the mixture will thicken up very quickly at this stage. The entire cooking will take 7-8 minutes.
11.)  Once the mixture is formed into a big lump like a soft dough, turn off the flame and take the mixture out on a plate/Bowl ( please do not skip this step, as the Pan is still hot , we cannot leave the mixture in the Pan. Else, the mixture will keep on cooking fuehrer and will be difficult to work with)
12.) Let the mixture cool down a little, so much so that you can touch the mixture
13.) In the meanwhile, Grease the Butter paper/plastic paper on which you plan to spread the mixture with Ghee or unsalted butter. Also grease the Knife that you will use to cut the barfi. ( A tip here, you can use pizza cutter to easily cut the evenly shaped Barfis)
14.)  Spread the mixture on the greased surface and using the rolling pin, with very gently hands roll the mix.
15.) Spread the mix up to a thickness of 1/3 inch, and then Spread Silver vark ( optional)
16.) Cut the Barfi/Katli in diamond shapes.


Voila, the Barfi/Katli are ready. These wholesome goodness of Almonds with awesome infused flavor of Saffron is a must try this festive season. So try it as I am sure your family and guests will definitely ask you for a second helping…

For more interesting, vegetarian recipes and eggless baking recipes, please follow us on - https://www.facebook.com/Chapanbhog

Happy Celebration and keep cooking
Thank
Shikha


Tuesday, July 28, 2015

No Cook No Bake Chocolate Pizza

No Cook No Bake Chocolate Pizza


Last week I had some guests who came home without giving notice. Personally I plan very quickly on what needs to be prepared and served to guests considering the ingredients I have at home. But, when it comes to dessert, I go absolutely blank. And on almost all such instances we end up getting ice cream from out and serve. But, this time that was not an option allowed; as our guests wanted to have something home cooked and of course by me.

It’s been long that I have been out for my regular grocery shopping due to rainy days, bad health and many other reasons. But, then when once in awhile a request comes up to prepare something its hard to refuse.

I quickly opened my Pantry had Dark Chocolate and a small tetra pack of Cream. Making Ganache was an immediate thought, but outing Ganache over what??? :P defiantly could not serve them Ganache as it is in a bowl.. :D :D

Having said above, I wasn’t very keen in putting much effort in baking/cooking and prepare anything much fancy.  I had initially thought of preparing a mousse but the cream I had was medium fat and not heavy cream, so mousse was out of option. Then I thought a little more and proceeded toward the cupboard where I store/hide rather all the munchies, biscuits, Chocolates from my little one. By god’s grace I found few interesting things that finally ended up in post..: P  

No cooks no bake Chocolate Pizza, which was served as a dessert. Not only had everyone loved it... Kids literally jumped out of their chair looking at the super tempting toppings.

So let me share how I made this super simple dessert:

Ingredients
·         200 Grams Dark Chocolate  ( I have used Dark Compound)
·         100 Grams ( 1 Small Tetra Pack) of Fresh Cream ( I have used Amul)
·         4 tbsp of unsalted butter
·         25 Oreo biscuits, Any flavor would do ( I have taken Chocolate Cream Ones)
·         ½ cup in total of toppings, you can use anything of your choice ( I have used
o   Mini Snicker Bars cut in half
o   Mini Bounty Bars Cut in Half
o   M&M
o   And Choco Chips
o   Few recommendation (You can use any of your favorite topping or anything available handy.  Butter Toffees, Caramel Candies, Regular Chocolate Bark broken in pieces, Marshmallow, Praline, Sugar sprinklers etc.)

Equipment s required:
·         An 8” spring form Cake Pan/ A loose bottom Tart tin would work too
·         A pan to heat cream
·         A Small Whisk
·         Grinder and a jar
·         A big bowl

Process
1.       In a grinder jar, put all the Oreo cookies and crush them in smooth powder.
2.       Once done, add melted butter and with help of your fingertips, mix them. Result should be coarse bread crumbs look alike textured mixture.
3.       Empty this mixture on the tart/cake tin. Try to press as evenly as possible this cookie mixture across the bottom and little towards the side of the tin.
4.       Once done, put this base in fridge to set for at least 45 minutes to 1 hour. ( Base of Pizza is ready)
5.       In the meanwhile, we will prepare Ganache ( Pizza Sauce for the Pizza)
6.       Take a pan, pour in the cram and on low flame let the cream warm. Ensure the cream is not boiled just warm, and turn of the flame as soon as it starts bubbling up.
7.       Add chopped dark chocolate to this cream, and cover with and plate and let this rest for 8-10 minutes.
8.       What happening here is, the heat of cream will help chocolate to melt. Thus, we do not have to melt and then mix the chocolate to cream and cook it separately.
9.       Once done, with the help of a whisk, beat this mixture together, and as you mix/whisk them together the mixture will starting smoothening up. And a nice glazed, smooth, shiny thick mixture of chocolate and cream is formed.
10.   So Ganache/Our Pizza sauce is ready too.  We just need to ensure the Ganache cools down a little before we use it on our cookie and butter base.
11.   Once the Ganache is cooled for good 8-10 minutes. Take out the base and pour the Ganache over it. You can give it a swiggy shake to ensure Ganache is spread evenly on the base.
12.   Pop this in fridge for at least 20 minutes.
13.   Post 20 minutes you can add the topping of your choice, and chill it for another 15-20 minutes.
14.   After that, very gently remove the pizza from tart /Cake pan and slice it.
I can bet once you serve this to your guest, they will ask you the recipe to try it themselves.  Just one thing to note this post is not for those who don’t love chocolates, as this is an overdose of chocolate…

Do try and share your experiences.
Happy Cooking and Stay Blessed
Shikha

For more interesting, vegetarian recipes and eggless baking recipes, please follow us on - https://www.facebook.com/Chapanbhog


Monday, July 13, 2015

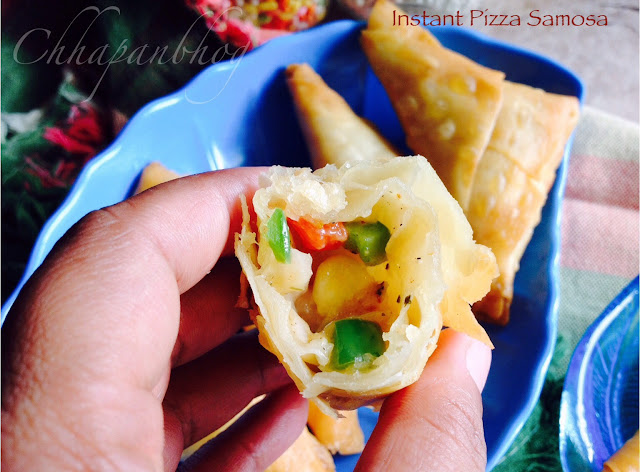
Instant Pizza Samosa

Instant Pizza Samosa


Who Doesn’t Likes Samosa!! The most Famous Indian Appetizer, that can part of breakfast, evening snack and for me it can be part of a meal too…:D

Almost every Indian craves for samosas as the monsoon knocks the door... the combination of piping hot Samosa with hot sip of coffee or Ginger tea is one of the best combos made in heaven..
I have tried out many fillings in Samosas earlier starting from the traditional potato filling to , Cottage cheese and mixed Veggie too..

It was last evening when it was raining heavily and I thought of making some samosas, but neither had I boiled potatoes handy nor plain flour to make the dough. But, once you decide to make something then you start craving for it isn’t it?? :P Same was with me, and I was in no mood spending entire evening in kitchen preparing something else to satisfy my crave for samosas…
I randomly opened the freezer to check what can be worked around, I found an unopened pack of Samosa Pastry Sheets/Patti Samosa Sheets, and block of cheese… Suddenly the bulb blinked with a visual of cheese oozing out from samosa in my mind… :D And I knew what I was up to…

This recipe is super simple, will take hardly 10 minutes including preparation and cooking time. You just need to have few things handy, without much talking lets begin on how to make these beauties…

Ingredients (will make 12 regular sized Patti Samosa)

·         12 Samosa Patti/ Samosa Pastry Sheet/Home dough would work fine too)
·         ¼ cup finely chopped onion
·         ¼ cup finely chopped tomato
·         3 tbsp of frozen corn  ( Microwave for 2 minutes)
·         Few sliced olives ( or any topping of your choice like Mushroom, jalapenos)
·         Salt as per taste
·         A pinch of black pepper
·         1 tsp of mixed herb/Pizza seasoning
·         ¼ cup shredded mozzarella
·         Flour paste ( 2 Tbsp of flour mixed in 2 tbsp of water to make a thick lump free paste)
·         Oil for deep frying


Process
1.       We’ll start by thawing the samosa sheets. You either take the required no. of sheets from refrigerator 2-3 hours prior to when you plan to make samosas. Or, I usually take the required no. of sheets and just defrost them in microwave by putting them in microwave for 10 seconds or so...
2.       Now, with filling; take a bowl add Chopped veggies (chopped capsicum, tomato, onion, olives and corn).
3.       To this add Salt, Black pepper and mixed herbs. Once done mix everything well with the help of a spoon.
4.       Now, add shredded cheese and give a final mix. With this our filling is ready.
5.       Now, keep one samosa sheet on your work surface and from one end fold diagonally to make a pocket where the filling can be stuffed.
6.       Once done, add a spoon full of filling and seal the samosa by folding the samosa diagonally till entire sheet is done, and towards the end apply some flour paste to seal. Make sure the samosa is not opened from any of the 3 corners.
Note: for better understanding of how to fold samosa, you can watch this video (video courtesy www.switzfrozen.com)

http://www.switzfrozen.com/how-to-fold-the-samosa/

                                                                                Or
Refer to the picture given below (Picture taken from http://www.spicytasty.com/)
7.       Fold all the Samosas following the same way.
8.       Once done, Deep fry them on medium flame till nice golden brown from all the sides.
9.       Your Pizza Samosas are ready, I bet these would become regular at your place just like mine..:D


There are few things though that needs to be taken care of while preparing and pre paring these Samosas if you are making them in bulk for any party or get together..
Tips:
·         Ensure to cover to cover the prepared samosas and the sheet not in use to always cover with a damp cloth, as they tend to dry out soon.

·         Ensure all the sides and corner are sealed properly, else while frying oil will ruin the samosas.


If you like the recipe for more interesting and vegetarian recipes and eggless baking recipes, please follow us on - https://www.facebook.com/Chapanbhog


Tuesday, June 16, 2015

Eggless, Classic Black Forest Cake

Eggless Classic Black Forest Cake


It was my Munchkin’s 2nd Birthday on 22nd of April, and we had planned a small celebration with very close family and friends. Since he is getting big fan of Thomas “The Train” we ordered a Thomas themed cake for him. But But But….. How could a Baker mommy not bake a cake for her Sonshine…. :D
Did this Simple, All time Fav. No fail recipe of a Classic Black Forest Cake. I had planned to go simple as already had too much to do for the celebration. So kept simple, and to my surprise even in this burning hot sunny days whipped cream behaved really well, and for the first time got Stiff peak as per my expectation. While Baking and Icing perfect cake, this was one eureka moment for me. And, what better that this was for my little hero.. 
Went simple with less coco in sponge as I didn’t wanted the sponge to taste bitter, went simple and less sugar on icing as wanted my champ to enjoy the cake without mommie dear worrying about the sugar content.
So this time I used aerated Soda for the sponge and was very happy with the results. Very soft, moist and perfect for any chocolate based cake. And because of Soda, I was pretty sure that the crumb would be nice and the cake will rise nicely.
I am planning to keep the sponge for my further cake with coco based as it is with this recipe.. J
So, let’s begin with ingredients followed by the process of Sponge, whipping the cream and at the end assembling of the cake..


Ingredients for the Sponge
-          1 and ½ cups of Plain Flour/Maida
-          ½ tin of condensed milk/ approx. ½ cup
-          1 Tbsp of Vanilla Essence
-          ½ tsp baking soda
-          ½ tsp baking powder
-          ½ cup melted butter
-          ¼ cup or more of Aerated soda ( you can use any cola, will not really make any difference to the taste)
-          2 Tbsp of Coco Powder

Process of Sponge
1.       Pre heat the oven at 180 Degrees C
2.       Grease and dust an 8” baking pan
3.       In a bowl take melted butter and add condensed milk to the same and mix till both are formed into a homogeneous mixture
4.       To this add vanilla and mix
5.       In a separated bowl take together flour, baking Soda, Baking Powder and coco. Mix them all well.
6.       Now mix the flour mix to butter mixture alternatively with cola ( Add ½ Flour mix and half Soda/Cola)
7.       Repeat till entire flour is mixed with butter mix and a nice smooth batter is formed.
8.       Pour the cake batter in the greased and tap the cake tin on kitchen platform couple of time.
9.       Bake at 180 degrees C for 30 mints. Or till a tooth pick comes out clean.


Ingredients for whipping the cream
-          1 cup heavy whipping Cream/I have used non dairy Whipping cream
-          ½ cup icing Sugar
-          Few Drops of Vanilla Essence

Process
1.       In a stand mixer bowl/ food Processor Bowl add the cream and on low speed beat till soft peaks are formed.
2.       Once done, slowly add the icing sugar and whip on medium speed.
3.       Once the peaks starts getting sift add vanilla and gradually increase the speed to high.
4.       Switch off the blender once sift peaks are formed.
5.       Put the cream in refrigerator for ½ hour before use


Ingredients for assembling the cake
-          Sponge
-          Whipping Cream
-          Chocolate Shaving
-          Canned and Seedless Cherries

Assembling of Cake
Process
1. Take the cake on a plate and slice into 3 using knife.
2. Now, take one of the slices on rotating table and apply sugar syrup
3. Take Dollop of Whipping Cream by a spoon, and spread evenly with the help of spatula, here if you wish you can also add chopped cherries.
4. Place 2nd slice and repeat the process, Spreading Whipping Cream and few Chocolate Shavings this time.
5. Place 3rd slice and now do a crumb coat / rough coat to the cake using generous amount of whipping cream. Here you need to roughly cover the entire cake with frosting using the spatula.
6. After the crumb coat freeze the cake for at least 20 minutes.
7. Now take generous amount of whipping cream and smooth en the cake from all the sides and top.
8. Now, decorate as you desire.

Your Awesome Looking and Tasting Black Forest Cake is Ready.. 

For more interesting, vegetarian recipes and eggless baking recipes, please followN us on - https://www.facebook.com/Chapanbhog


Friday, June 5, 2015

No Cook/No Bake Lycee/Litchee Cheese Cake

No Cook/No Bake Lycee/Litchee Cheese Cake


So this is my Second Post to the #BeatTheHeat Series

As shared earlier I’ll be doing some summer special recipes this season and share with you all. The series continuous with this NO Bake No Cook Lychee Cheese Cake. J

Who Thinks a Cheese Cake is an Extravagant Dessert that is available only at restaurants?? Well, Give it a thought again and look at the pictures of this yummy, refreshing and easy to prepare cheesecake that I have prepared at the comfort of my home with few ingredients.

You can whip up a cheese cake in no time and without much effort, you just need to get hold of few ingredients that are easily available at any grocery/baking Store these days.

Lychee is my Favorite summer Fruit, yes you read it right, I love Litchis more than Mangoes..:) I find absolutely refreshing, sweet when perfectly ripened and so juicy…  I personally Love Lychee Ice Cream, and any other dessert made From Lychee, so is my Love for Litchis… :D

This season I tried my hand on the Lychee Cheese Cake, and it was yummmm… Just Yummm 

We finished the whole cheesecake in just 2 days, it was light, perfect Sweetened, refreshing and a perfect delight for that hot sunny day..

So let’s begin with the list of Ingredients followed by the steps..


Ingredients

·         A Loose Bottom/Spring Form Cake Tin. A loose Bottom Tart Pan would work too.
·         18-20 nos.  Low Sugar/Digestive Biscuit
·         4 tbsp of melted butter
·         300 Grams of Cream Cheese, I have Used Britania ( if you are not able to get hold of Cream Cheese you can use ¾ cup of thick hung Curd)
·         ¾ Cup of  sweetened Condensed Milk
·         ½ Cup Whipped Cream
·         200 Grams of shredded  Paneer/Cottage Cheese
·         ¾ cup of Lychee Puree
·         2 tbsp of Gelatin Powder/can b replaced by agar agar powder 
·         3 Tbsp of Warm water


Process

1.       Take a blender jar/ Food Processor add biscuits and make a smooth powder out of them.
2.       Take out the biscuit powder in a bowl add Melted butter and mix thoroughly with tips of your finger.
3.       Now set this mixture in a greased loose bottom cake ban. Start with bottom, ensure to set very tightly. Start with your finger tips then you can use back of a flat glass to smoothen the surface. Pop this in fridge to set for at least 30 minutes.
4.       In a small bowl add gelatin powder and water, and start stirring the gelatin as soon as you can after adding it to water. Mix till the gelatin dissolves completely with water.
5.       Set this gelatin mixture aside to cool.
6.       Now, In a blender jar/ Food Processor add Condensed milk, Cottage Cheese, Cream Cheese and mix them nicely.
7.       Once done, add Lychee Puree and Whipping cream to the mix and once again mix everything well.
8.       Now, add the gelatin mixture and give the mixture a final mix.
9.       Pour this mixture on biscuit layer of the Cake pan and smoothen the surface with back of a spoon/Spatula.
10.   Keep the cake pan back in fridge and this time for 3-4 hours so as to set the cake nicely.
11.   After 3-4 hours once cake is set nicely, decorate as your desire. I have used some Curry Leaves and whole Lychee, be creative and show your skills to decorate your own cheesecake..:)
12.   From bottom of the Cake pan, lift the cake very gently. Slice , serve and don’t forget to indulge yourself and give a tap on your back for creating this exceptionally amazing Cheesecake..:)

Happy Cooking and Stay Blessed
Love
Shikha <3

For more interesting, vegetarian recipes and eggless baking recipes, please follow us on - https://www.facebook.com/Chapanbhog

And, I am glad to take this Summer Delight to Angies Fiesta Friday Co hosted by amazing  Lauri and Jhuls.. A very happy FF.. :)


Sunday, May 31, 2015

Jumbo Veggie Burger

Jumbo Veggie Burger


What Would you do when you crave to eat something nice, filling, Delicious, Loaded with veggies and Some Health has to be considered too.. :P :D ) But too lazy to step out and go to treat yourself??

This happens to me all the time, especially on Friday evenings. And, you know what Lazy does on such day??? Me who is tiered to go out and eat ; spend hours in kitchen to prepare the thing that I wanted to quench my craving..: D I know silly me, but I Love my kitchen and cooking..:)

So gone Friday was such evening when I was craving for some nice and yummy burger. Yes, I love Burgers as Much as I Love Chole Bhature… :D but, was lazy to go out and eat one, so ended up making one at home. So it was an early Dinner kind of a thing and I enjoyed my Veggie burger sitting on my couch with a big glass of a cold coffee.:)

Since I know I would be frying my burger patty, thought of making it as healthy as possible by adding lot of veggies in it. I have Also used Chickpeas, to give the patty a nice binding as well as nutty taste. The Patty Came out to be Super Yumm and Crisp, I loved the patty so much so that I kept the patty dough and next day made cutlets from them..:D

I will quickly share the List of Ingredients and then the Step to follow for prepration and Assembling of the burger.


Ingredients for Patty

·         1 Small Onion finely Chopped
·         ¼ cup carrot finely Chopped
·         Some French Beans finely Chopped
·         Some Green Peas
·         3 medium sized Boiled, Pealed and Mashed Potatoes
·         ½ cup Chickpeas (Soaked Overnight and boiled till tender morning) I have used the leftover chickpeas I have boiled previous day for Falafels.
·         ¼ cup Beaten Rice/Poha  ( Soaked and Drained)
·         1 Tbsp butter
·         ½ Tsp ginger Garlic Paste
·         ½ Tsp Tumeric powder
·         ½ Tsp Garlic Powder
·         ½ tsp Paprika Powder
·         ¼ tsp Amchoor powder/Dry Mango Powder
·         Salt to taste
·         1 tsp of coriander powder
·         ½ tsp of cumin powder
·         ½ tsp of Garam Masala
·         ½ tsp dried parsley
·         ¼ cup pain flour
·         ¼ cup bread Crumbs
·         Oil for Frying

Ingredients for tangy Mayo Salad
·         ¼ Low fat eggless Mayonnaise ( I have used, you can use any of your choice)  
·         2 tbsp tomato ketchup
·         1 tbsp of red chilli sauce
·         ¾ cup of total finely sliced onion, carrots, capsicum and cucumber ( you can add veggies of your choice)
·         ¼ tsp black pepper powder

Ingredients for assembling the Burger
·         Burger Buns
·         Butter to toast the buns
·         Mayo Salad
·         Burger Patty
·         Cheese Slice
·         Lettuce leave


Process for Preparing Patty

1.       In a Blender Jar, put the Soaked and Boiled chickpeas and make a Coarse paste from it and keep aside.
2.       In a pan, heat butter. Add Ginger garlic paste and sauté for 1 minute.
3.       Add Chopped onion and cook till translucent.
4.       Once done add Chopped Carrots, Beans and Peas and some salt. Cook this for 3-4 minutes till carrots becomes little soft.
5.       Now add the potatoes and the seasoning ingredients I.e. Tumeric powder, Cumin powder, Coriander powder, Garam Masala, paprika powder, garlic powder, and mix well.
6.       Cook this for about a minute or so, and then add the poha or beaten rice and mix everything well.
7.       Now turn off the flame and let this mixture cool a little.
8.       Once done, take this out in a bowl, to which add chickpeas paste, dried parsley, and mix everything really well.
9.       Patty mixture is ready. Take appropriate portion of this mixture as per the size of your burger bun and keep aside.
10.   Once all the patty are shaped, put the oil for frying to heat on medium flame.
11.   Make dropping consistency paste of flour and water.
12.   Take each patty dip in flour mixture then roll in bread crumbs nicely.
13.   Ensure the crumbs are coated from all the sides of the patty.
14.   Once done, fry the patty till nice golden brown from both the sides( ensure not to fry too many patties in the pan t a time)
15.   Burger Patties are Ready

Process for Mayo Salad
1.       In a small bowl, take mayo add tomato ketchup and chilli ketchup to it.
2.       Mix well. Now add black pepper powder and give a mix again.
3.       Pour this mayo on the sliced veggies and mix everything really well.
4.       The mayo salad is ready.


Assembling of the Burger:
1.       Slit the burger pan from middle.
2.       Apply butter on both the sides and toast on a skillet/pan
3.       Once done, keep a lettuce leaf on the bottom part of the bun.
4.       Apply 2 tbsp of mayo salad.
5.       Keep one burger patty on the salad.
6.       Keep a cheese slice, and then the upper part of burger bun.
7.       Press very slightly, or seal everything using a toothpick.
8.       Serve with some wafers/French fries, Potato wedges and your favorite drink.
9.       Your Jumbo burger is ready, I can bet you will love it and stop eating burgers from our post having this.:)
Happy Cooking and Stay Blessed
Love
Shikha

For more interesting, vegetarian recipes and eggless baking recipes, please follow us on - https://www.facebook.com/Chapanbhog